
- My Wishlist Button is Missing
- The wishlist button is displayed only on the first product on the Collection pages
- Confirmation Modals/Popups are not displayed on My Wishlist Page
- Appearance of Modals/Popups get distorted on My Wishlist Page
- Product items are not displayed properly on the My Wishlist page
- The product title overlaps the Variant Title and price on the My Wishlist page
- The Add All button appears and then disappears on the My Wishlist page
- How do you add Wishlist buttons to the Search Results Page?
- How do you add Wishlist buttons to the Cart Page?
- How to change the Wishlist Page URL?
- How to add Extra CSS to be displayed on your Shopify Store?
- How to view Customer Wishlists?
- How does Wishlist Sharing Work for Wishlist Guru?
- How to enable App Blocks in Theme App Extension?
- How do I change my Wishlist Guru plan?
My Wishlist Button is Missing #
There could be several reasons for this issue. Let’s explore each scenario and the usual steps to resolve them, ensuring that the app button displays and functions correctly.
Case 01: If your button is missing on products then check whether the Wishlist button toggle is in On condition in the customizer.
For that Navigate to the Enable Theme button on the dashboard page and then click on the “App Embeds and check whether the Wishlist button toggle is “On”. If it is not in the “On” condition then click on it to toggle it to the “On” condition and then press the Save button (located in the top right corner). For more read it here.
Case 02: You forgot to add a Wishlist Button Block. To do that follow the instructions given below:
Navigate to your online store and click on Customize>Sections. Choose the template in which you want to show the position, then locate the ‘wishlist button’ block. Add that block and save it. For more information Read it here.
Case 03: Maybe your CSS is conflicting with the Wishlist button. To show the wishlist button set the display to block as shown in this code snippet in the Custom CSS section. To read more about how to add custom CSS Click here.
#wishlist{
display: block !important;
}
The wishlist button is displayed only on the first product on the Collection pages #
To address the issue of the wishlist button only being displayed on the first product on the Collection pages, you’ll need to ensure that the custom code snippet for the wishlist button is properly implemented. Here’s how you can troubleshoot and potentially fix this issue:
Verify Implementation in “card-product” file: Double-check that the custom code snippet for the wishlist button is present in the “card-product” file. Ensure that it is placed within the loop that iterates over each product in the collection.
Check Data Binding: Ensure that the data-productID attribute in the button snippet is correctly bound to each respective product’s ID. This ensures that when a user interacts with the wishlist button for a specific product, the correct product ID is captured.
Save Changes: After making any modifications to the code in the respective file, be sure to save the changes before previewing the Collection pages again.
Theme Compatibility: Consider the possibility that the custom code snippets may need to be adjusted slightly to be compatible with your specific theme. If the data binding or structure differs from what’s provided in the instructions, make the necessary adjustments accordingly.
By following these steps and ensuring that the wishlist icon and button snippets are correctly implemented within the loop for each product, you should be able to resolve the issue of the wishlist button only being displayed on the first product on the Collection pages. For more information Read it here.
Confirmation Modals/Popups are not displayed on My Wishlist Page #
There might be various factors contributing to this problem. Let’s investigate each possibility and the typical actions required to fix them, guaranteeing that the Modals/Popups are shown and operate as intended.
Case 01: Check in the app whether you have selected the Wishlist UI type as a modal or not. If not then select the Wishlist UI type as a modal. To know how to set UI type as modal Read here.
Case 02: Maybe your CSS is conflicting with the Modal/Popup. To show the Modal add the following snippet code in the Custom CSS section. To read more about how to add custom CSS Click here.
.modal {
    display: block!important;
    position: fixed!important;
    z-index: 199!important;
    width: 100%!important;
    height: 100%!important;
    overflow: auto!important;
}
Appearance of Modals/Popups get distorted on My Wishlist Page #
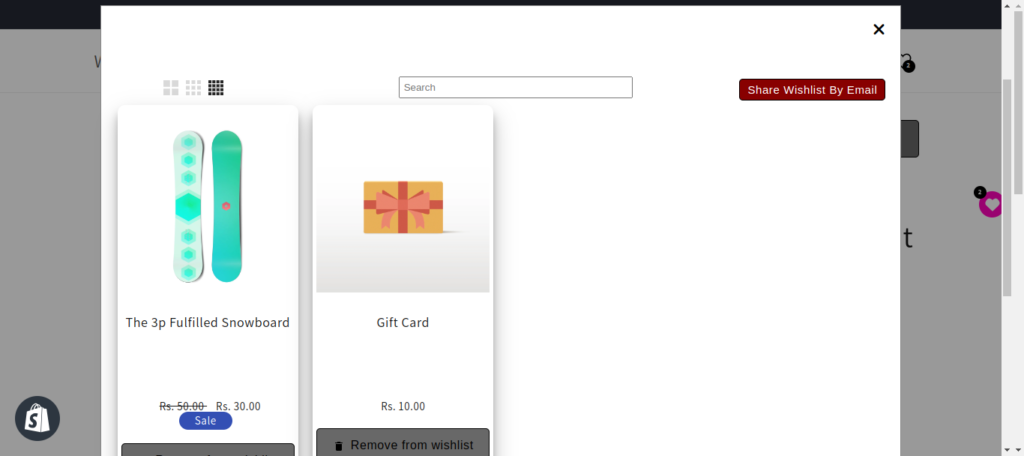
There maybe various potential causes for this problem. Let’s examine each situation and the typical steps to address them, ensuring that the Modals/Popups appear and function correctly on your wishlist page. Below is the attached screenshot showing a distorted modal and correct modal.
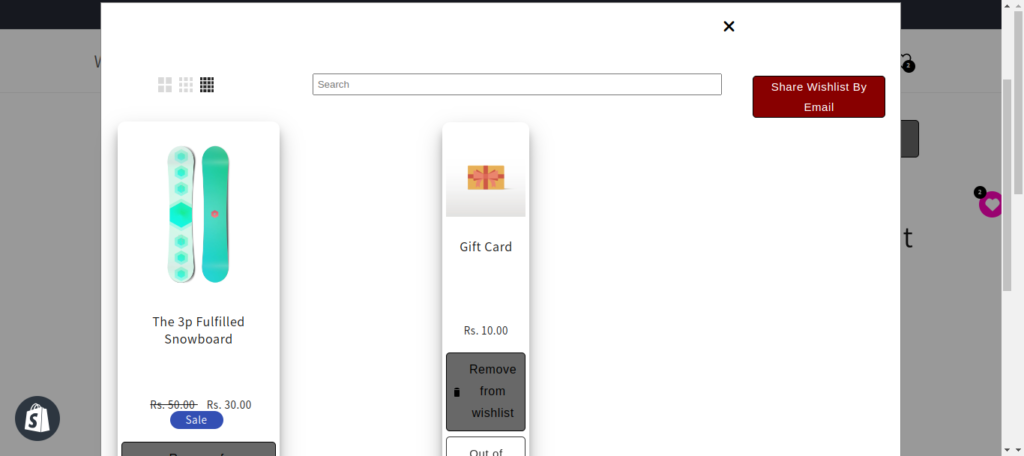
Case 01: Verify within the app if the correct settings for the modal are selected, including text alignment, width (which only applies to modal option), and padding for top, bottom, left, and right.
Case 02: It’s possible that your CSS is conflicting with the Modal/Popup. To ensure proper display of the Modal, include the following code snippet in the Custom CSS section as demonstrated below. For more information on adding custom CSS, Refer to this link.
.modal {
    position: fixed!important;
    z-index: 199!important;
    left: 0!important;
    top: 0!important;
    width: 100%!important;
    height: 100%!important;
    overflow: auto!important;
}
Product items are not displayed properly on the My Wishlist page #
There might be two cases regarding this issue which we have discussed below:
Case 01: Choose the template right so that all the Product items get displayed correctly. To choose a template proceed to the “Online store” section and access the “Pages” option. Locate two pages named “wishlist” and “shared wishlist”. For both pages, select the corresponding theme template: “wishlist” for the “wishlist” page and “shared wishlist” for the “shared wishlist” page. With these steps completed, your product items will be displayed properly.
Case 02: After you have tried adding the template provided by us still on your wishlist page product items are not displayed properly then maybe you need to try changing settings regarding the Wishlist UI type like its color for the Background, color for the Text, Text Align, Width (only works for modal option), Padding- Top, Bottom, Left & Right.
The product title overlaps the Variant Title and price on the My Wishlist page #
Occasionally, there might be an issue where the product title overlaps with the variant title or price on the My Wishlist page, particularly when the product title is lengthy.
Case 01: To address this concern, we’ve fixed container heights on the Wishlist page to facilitate the horizontal alignment of products. However, this can sometimes result in element overlap if one of them exceeds the average length. Thankfully, resolving this is straightforward by adding the following CSS code in the Custom CSS area. Here you can also easily adjust the px value which is 50 here in this case according to your requirements.
.title11 {
height: 50px !important;
}
Case 02: You can also go into the app settings and find the button settings that help you adjust the various button sizes to remove the problem of overlapping.
The Add All button appears and then disappears on the My Wishlist page #
This issue can arise due to multiple reasons, some of which are listed below:
Case 01: Your style settings may not be applied correctly. To change the color, size of the text, color of the text, and various other options you can go to the app button settings page, where you will find all the settings related to this. If still you are not satisfied with the styling you can do Custom CSS also. To read about Custom CSS you can Click here.
Case 02: Maybe your browser cache is not cleared properly. So to do that clear your browser cache and then reload the web page again.
How do you add Wishlist buttons to the Search Results Page? #
To enable the Add Wishlist button on your Search Results page using Wishlist Guru, follow these steps:
Step 01: Navigate to the Shopify Admin Console and go to Online Store > Themes > Edit Code.
Step 2: Locate your search file. Then, navigate to the search.json template file.
Once in the search.json template file, search for the section corresponding to the one used in your search template. In our case, it is identified as “main-search”.
Afterward, search for your section file which in our case is “main-search.liquid“. Within this section file, identify the snippet which is used to show products on your search result page (in our case it is card-product).
Step 04: Now search your snippet name ( card-product.liquid file in our case ) and then Add the following custom code snippet at the appropriate location (where you want to show your button) within this file:
Example for the Button: <div class=”wf-wishlist-button” data-productID=”{{ card_product.id }}” producthandle=”{{ card_product.handle }}” ></div>
Note*- Depending on your theme and file you might have to modify the above code slightly. As data-productID is different in different themes. So in place of card_product.id you can put your data-productID.
Note*- Don’t forget to save your settings after adding these code snippets to your files.
How do you add Wishlist buttons to the Cart Page? #
To enable the Add Wishlist button on your cart page using Wishlist Guru, follow these steps:
Step 01: Navigate to the Shopify Admin Console and go to Online Store > Themes > Edit Code.
Step 2: Locate your cart file. Then, navigate to the cart.json file.
Once in the cart.json file, search for the section corresponding to the one used in your cart template. In our case, it is identified as “main-cart-items”.
Afterward, search for your section file which in our case is “main-cart-items.liquid“. Within this section file, identify the area where you want to show your Add to Wishlist button on the cart page.
Step 04: Add the following custom code snippet at the appropriate location (where you want to show your button) within the this file (“main-cart-items.liquid” ):
Example for the Button: <div class=”wf-wishlist-button” data-productID=”{{ card_product.id }}” producthandle=”{{ card_product.handle }}” ></div>
Note*- Depending on your theme and file you might have to modify the above code slightly. As data-productID is different in different themes. So in place of card_product.id you can put your data-productID.
As in our case data-productID is product.id. So in place of card_product.id we use the product.id
Example for the Button: <div class=”wf-wishlist-button” data-productID=”{{ product.id }}” producthandle=”{{ product.handle }}” ></div>
Note*- Don’t forget to save your settings after adding these code snippets to your files.
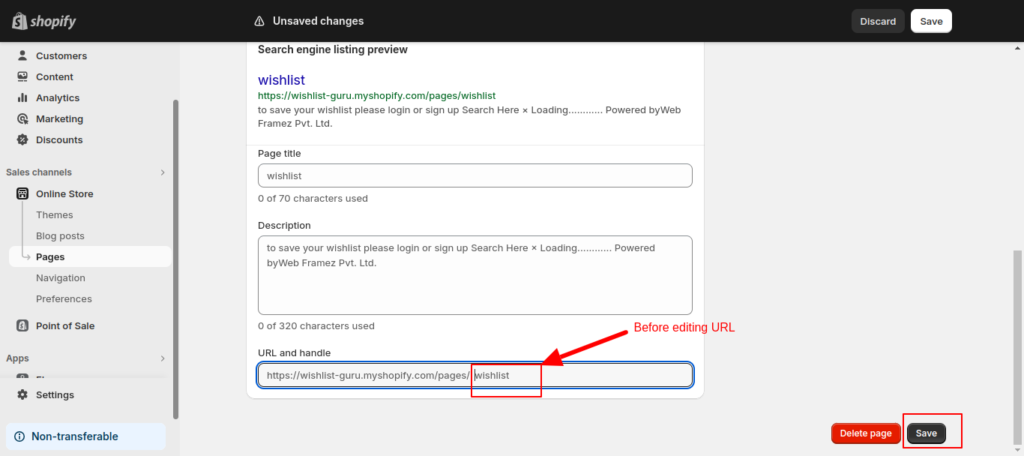
How to change the Wishlist Page URL? #
To change the URL for the Wishlist Page you can follow the simple steps given below:
- Go to Online Store > Pages > Wishlist > Edit Website SEO > URL and handle
- At URL and handle you can edit your URL for the Wishlist Page which is the new URL for you app.
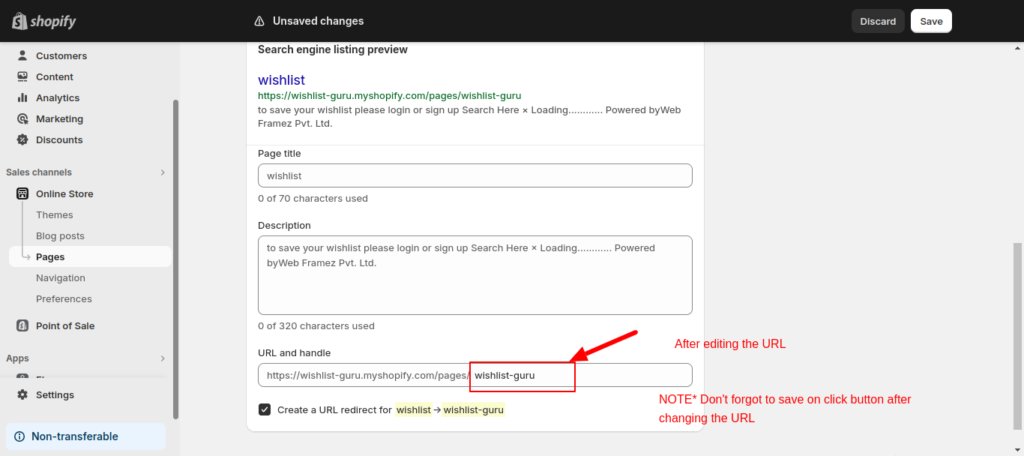
- Now if your page redirect is automatically created or not then you have to go to Navigations > View URL redirects > There you will see your page redirect from /pages/wishlist —-> your desired URL.
- Or you can create your own page redirect URL by clicking on the Create page URL redirect located at the top right corner of the page. On clicking you will see two options one is redirect from where you have to add the previous URL and the other option is redirect to where you have to add the newly created URL and by clicking the save redirect button your newly created URL button will work as fabulous as the previous one.
How to add Extra CSS to be displayed on your Shopify Store? #
To add custom styling to your store, follow the given below instructions. But, before proceeding further, ensure your plan is upgraded to Basic or above.
Go to the Dashboard page and within the quick access section find the settings that say “Custom CSS and Custom js/jQuery code” and then click on the Configure button.
Within this section, put your custom CSS styles in the custom CSS box according to your requirements. For your styles to take effect without any issue you need to utilize the “!important” declaration. By using “!important”, you can enforce your styling choices, even if they conflict with existing styles from your theme or other CSS rules, for more information Read here.
Note*- Save your settings after adding the code in the custom CSS section.
How to view Customer Wishlists? #
To access Customer Wishlists, go to the App Report page.
Here, you’ll find a list of users along with their login details. Click on “View Detail” next to a specific user to see their wishlist items.
How does Wishlist Sharing Work for Wishlist Guru? #
In the “Share Wishlist Setting” section, administrators have the flexibility to control sharing permissions. There are two distinct options:
- Login User:
- By selecting this option, sharing the wishlist is restricted to users who are logged into their accounts.
- All Users (Guest and Login Both):
- Opting for this setting allows both guest users and logged-in users to share wishlists.
In the “Share Wishlist (Via Email, Facebook & X)” settings, users have diverse sharing options, including URL, Email, Facebook, and Twitter (‘X’):
- Subject: “Wish List from [Customer’s Name]”
- Message Placeholder:
- Use ##wishlist_share_email_customer_name## anywhere in the email to replace it with the customer’s name.
- Use ##wishlist_share_email_customer_message## in the email body to replace it with the customer’s message.
- Use ##wishlist_share_email_wishlist_url## in the email body to replace it with the Customer Wishlist page link.
These customizable features empower you to personalize user-sharing communication, fostering a more engaging and user-friendly experience. For more information Read here.
How to enable App Blocks in Theme App Extension? #
To enable App Blocks in your Theme App Extension:
- Navigate to Online Store > Customize in your Shopify admin dashboard.
- Select the template where you want to add the wishlist button (e.g., Products template).
- Click on the section(located on the left side) in Customizer.
- Add a block by clicking the “Add block” button.
- Choose the wishlist button from the options.
- Save your changes.
By following these steps, you can quickly enable App Blocks and add the wishlist button to your desired template in your Theme App Extension, for more information Read here.
How do I change my Wishlist Guru plan? #
In the “Paid Subscription” section, you have the flexibility to select from various paid plans, unlocking additional features for your site. The subscription options are available on a monthly and yearly basis, allowing you to tailor your investment based on your preferences and budget.
Step 01: Select the subscription that aligns with your preferences and the corresponding plan prices will be displayed accordingly.
Step 02: Examine the features and details of each plan, considering factors such as functionalities, and pricing.
Step 03: Click on the change plan button (Free, Basic, Pro, Premium, or Enterprise) that best suits your requirements and budget.
Further, when you click on the “Change Plan” button, a new window will open, providing detailed information about the plan you selected. You just have to follow the instructions and after successful payment, you should receive a confirmation of your subscription, along with any relevant account details or instructions.


