
Why It Matters #
Wishlist activity is one of the clearest signals of customer purchase intent. When a shopper adds a product to their wishlist, they are telling you what they care about—but without the right follow-up, that intent is often lost.
By integrating Klaviyo with Wishlist Guru, you can turn wishlist behavior into actionable marketing. Track what customers save, identify products they’re waiting for, and trigger timely, personalized emails for restocks, price drops, or reminders. This helps you stay relevant, re-engage interested shoppers, and convert intent into revenue.
Benefits of Integrating Klaviyo with Wishlist Guru #
- Capture High-Intent Customer Data
- Track wishlist actions to understand exactly what products customers are interested in, even before they purchase.
- Automate Wishlist-Based Emails
- Trigger emails automatically when customers add items to their wishlist, reducing manual effort while maintaining timely follow-ups.
- Recover Lost Sales Opportunities
- Re-engage customers who showed intent but didn’t complete a purchase with reminders, restock alerts, or price-drop notifications.
- Create Smarter Customer Segments
- Segment customers based on wishlist behavior (saved products, categories, brands) to send more relevant and targeted campaigns.
- Deliver Personalized Product Recommendations
- Recommend similar or complementary products based on wishlist data to increase average order value.
- Improve Email Engagement Rates
- More relevant messaging leads to higher open rates, click-through rates, and overall campaign performance.
- Increase Conversion Rates
- Timely, behavior-based communication helps move customers from consideration to purchase faster.
- Strengthen Customer Retention
- Consistent, personalized follow-ups build trust and keep customers coming back to your store.
Customer Email Preferences & Opt-Out (For Klaviyo Flows) #
Wishlist Guru sends two key signals to Klaviyo so you can build clean and compliant wishlist email flows:
1. Customer Email Preferences
Customers can choose which wishlist emails they want to receive (wishlist reminders, price-drop alerts, restock notifications). These preferences sync to Klaviyo and can be used as flow conditions or segment filters.
2. Wishlist Email Opt-Out
Customers can fully opt out of wishlist emails. When enabled, this opt-out status is sent to Klaviyo and should be used to exclude customers from all wishlist-related flows.
How to Use in Klaviyo:
Trigger flows using wishlist events → add a filter to exclude opted-out customers → apply preference-based conditions before sending emails.
This ensures you send only relevant wishlist emails, stay compliant, and improve engagement.
How to Set Up the Klaviyo Integration with Wishlist Guru #
Creating a Private API Key in Klaviyo for Wishlist Guru
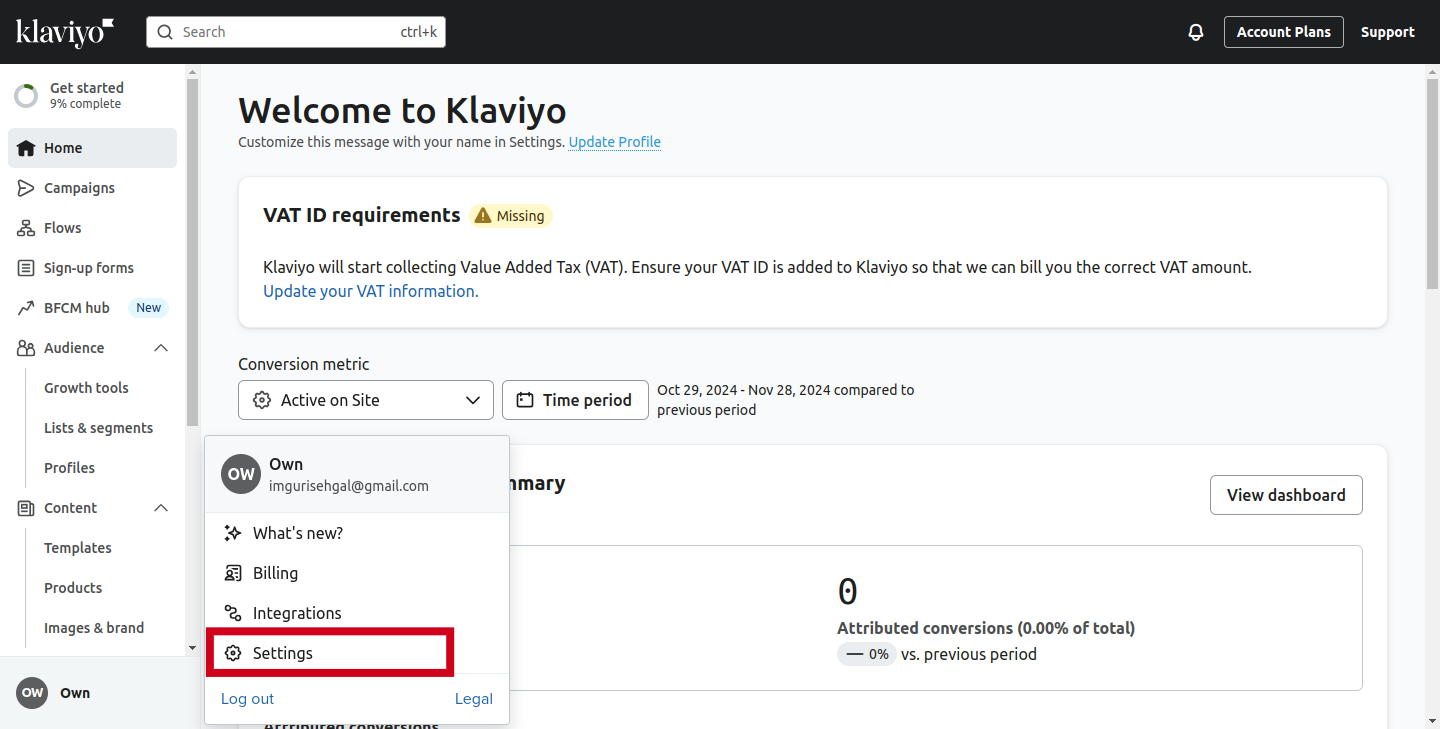
- Log in to Klaviyo:
- In Klaviyo, select your profile from the bottom left-hand corner of the page.
- Navigate to API Keys:
- Click on Settings → Account → API Keys.
- Click on Settings → Account → API Keys.
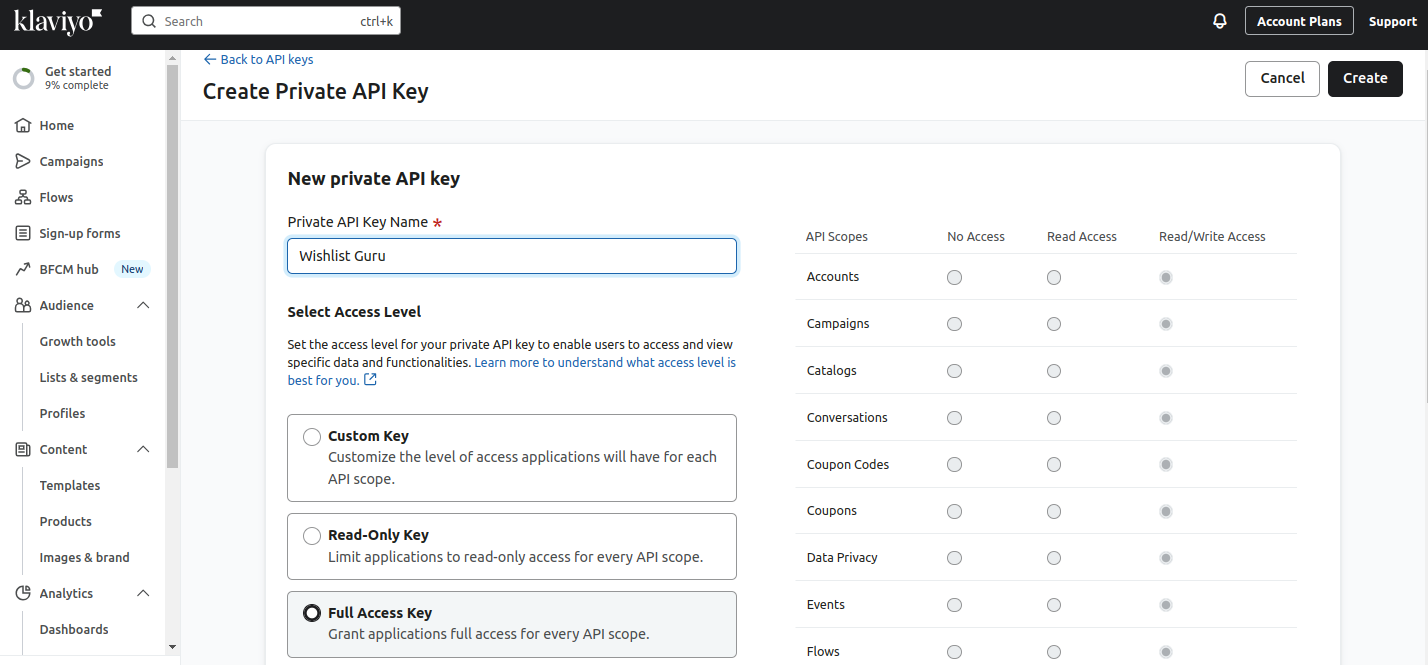
- Create a New Private API Key: Learn from here
- Click Create Private API Key.
- Name your new API key to differentiate it from other keys.
- Select Full Access Key and then click Create.
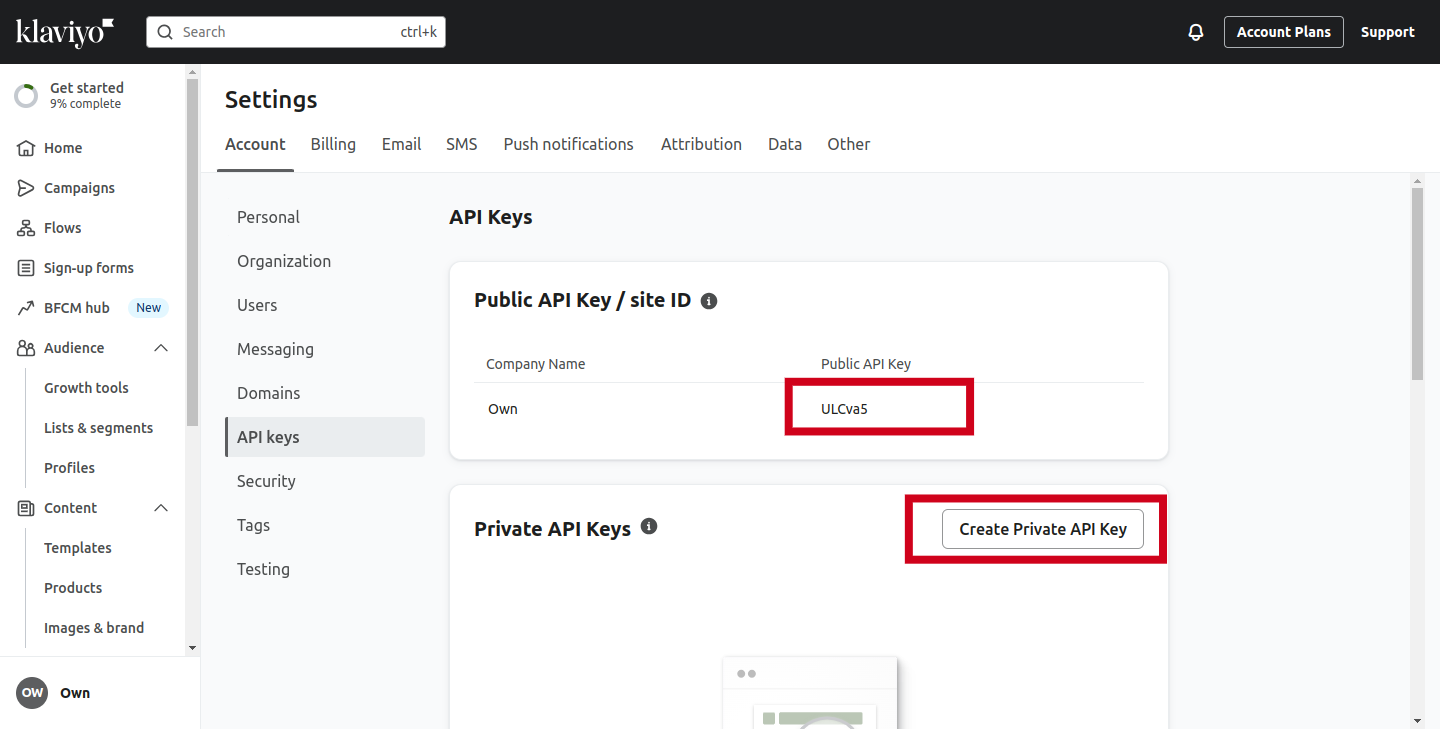
- Copy API Keys:
- Take note of your Public API Key and Private API Key.
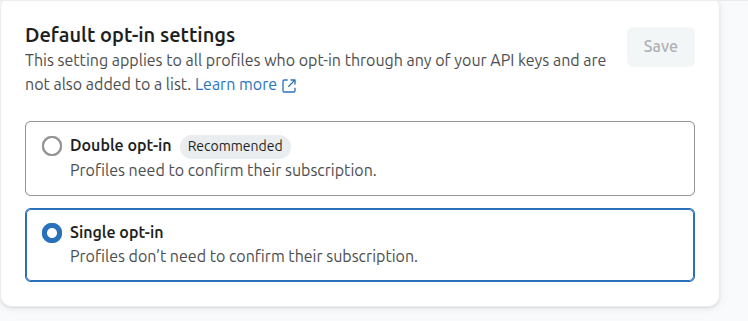
- You must choose the Single Opt-in option in your Klaviyo. So the user adds as a subscriber in the list.
- Integrate with Wishlist Guru:
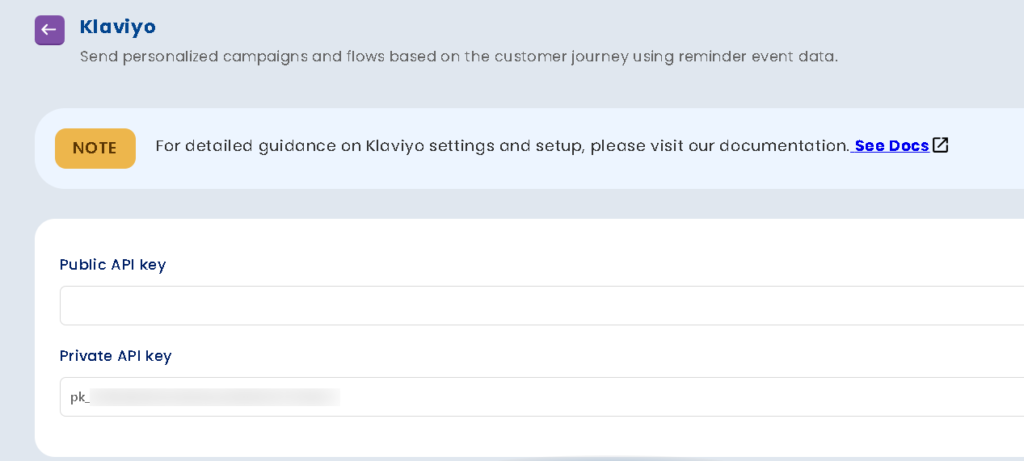
- In your Shopify admin, go to the Wishlist Guru app.
- Click General Settings, then select Klaviyo integration.
- Enter API Keys in Wishlist Guru:
- Paste your Public API Key into the first field.
- Paste your Private API Key into the second field.
- Click Save.
This completes the Klaviyo API integration for Wishlist Guru.
To set up a Klaviyo flow for Wishlist Guru, follow these steps : #
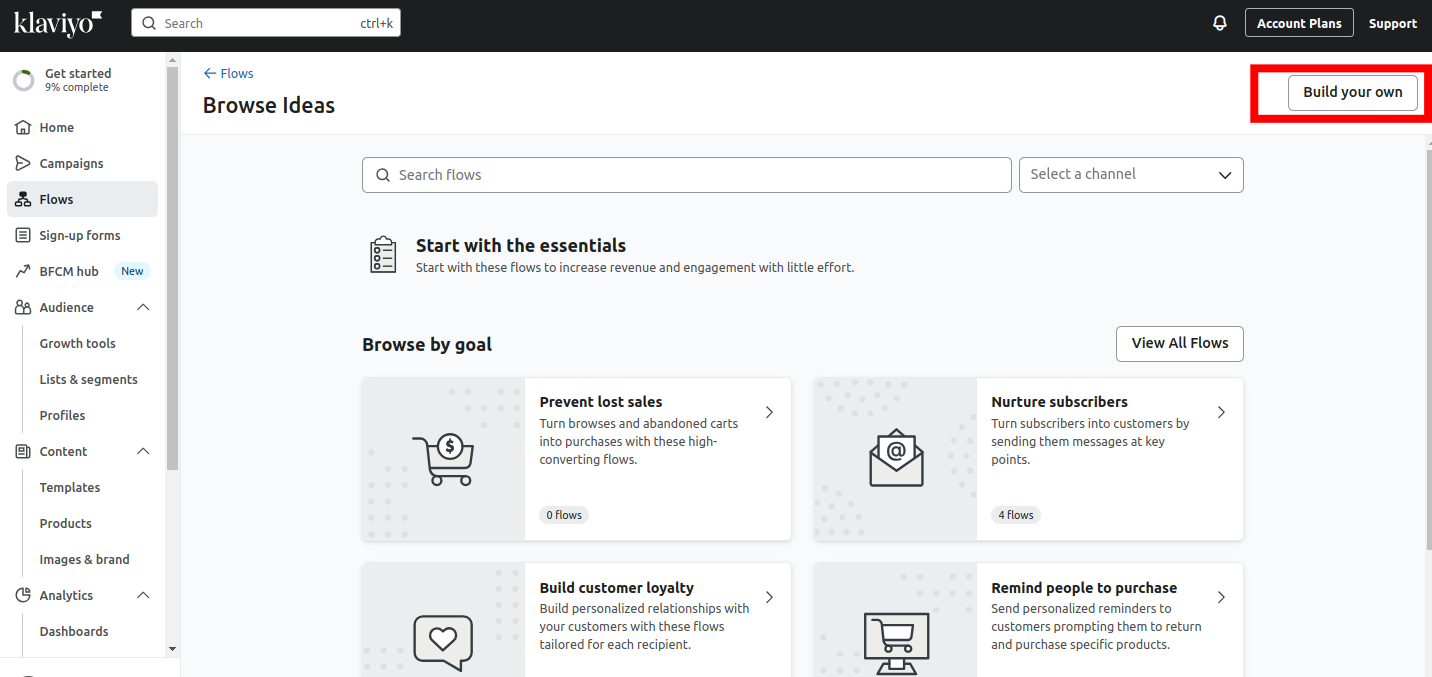
1. Create a New Flow: You will learn from here #
- Navigate to Flows → Create Flow.
2. Choose Flow Type #
- Select Build Your Own to create a custom flow.
3. Name Your Flow #
- Name your flow as per your wish (e.g., “Wishlist Guru – Product Added”).
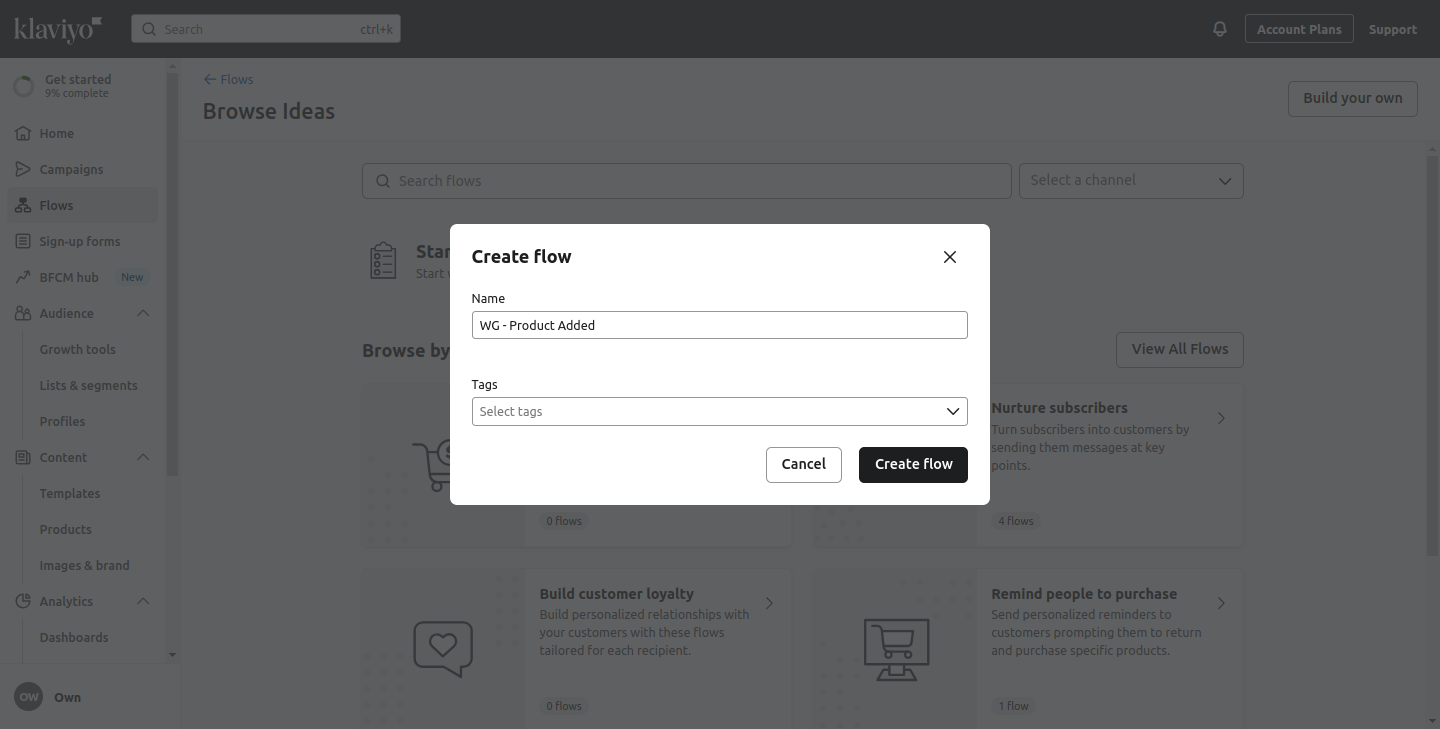
**Pro Tip:** If you don’t see **Wishlist Guru – Product Added** in your metrics, it simply means Klaviyo hasn’t received this event yet. To fix this, log in to your store and add a product to the wishlist once—this will send the event to Klaviyo. After that, the event will appear in your metrics and can be used in flows.
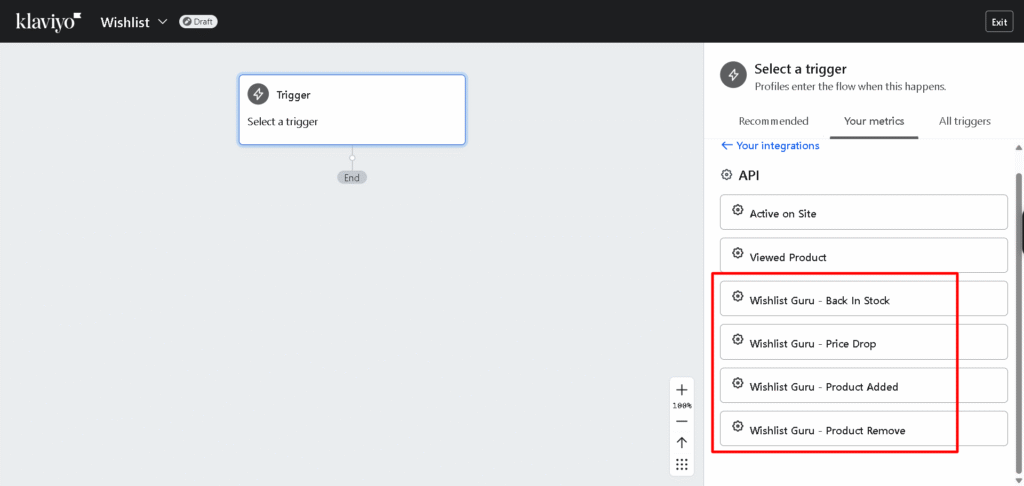
4. Select Trigger #
- Select Trigger
- Choose your Metrics and then select API.
- Select the API event that you want to set up for the flow. (It fetches all users who add a product to their wishlist)
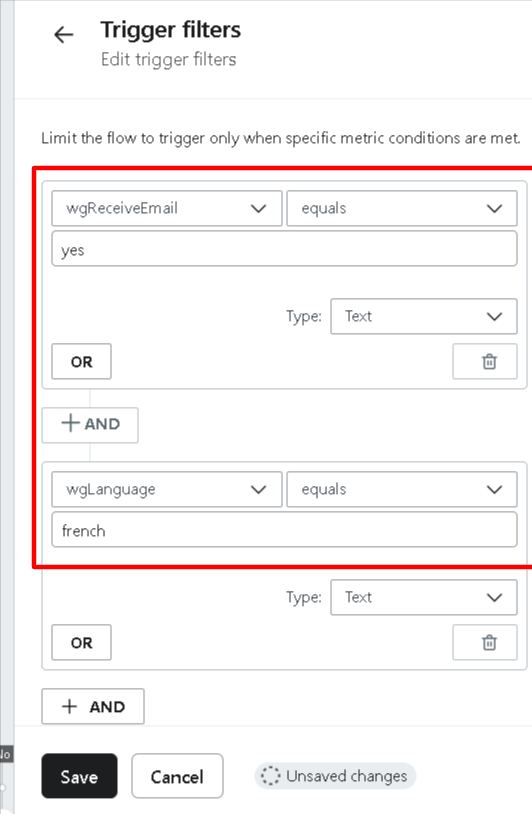
- Our app automatically creates a Wishlist user list in Klaviyo. You can use this to send offers or personalised emails to all Wishlist users.
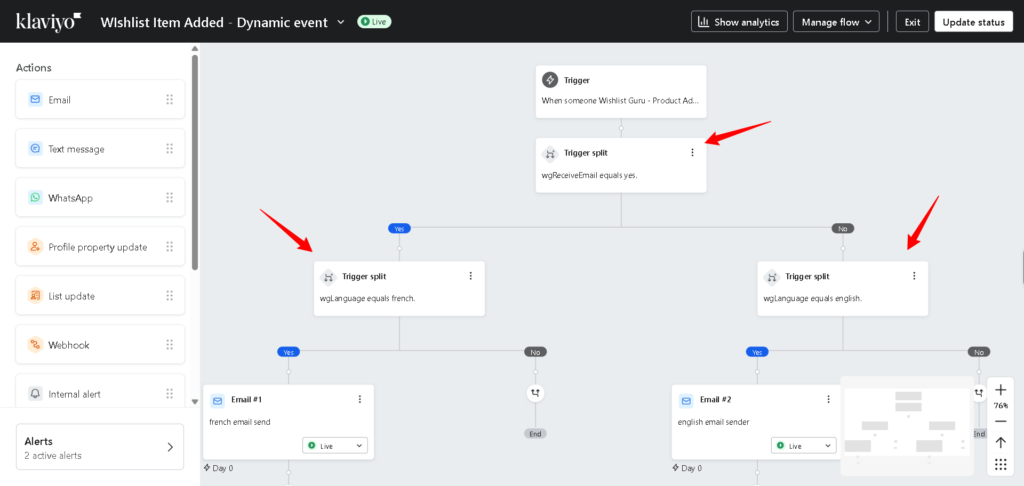
This flow first checks whether the customer has agreed to receive emails. If email consent is given, Klaviyo then sends the message in the customer’s preferred language, such as French or English, ensuring both compliance and personalization.
5. Add an Email Step to the Flow #
- Under Actions, click and drag Email beneath the flow trigger.
6. Select the Email Template #
- Once the Email action has been added to the flow, click on the email step to configure it.
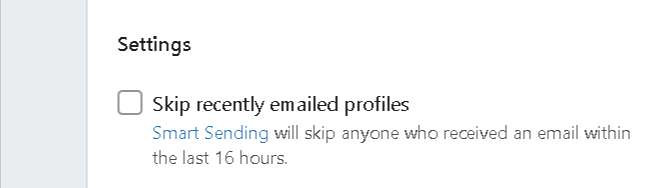
- Make sure you choose this setting so the customer receives the email again if they add a new item to the wishlist.
Configuring Email Template #
Klaviyo offers a range of dynamic product data that you can include in your emails and SMS. This product data can be pulled from your store using the catalogue lookup. Each product event includes a ProductId attribute you can use to look up more product data.
Create a static table block for single-product events: Learn from here #
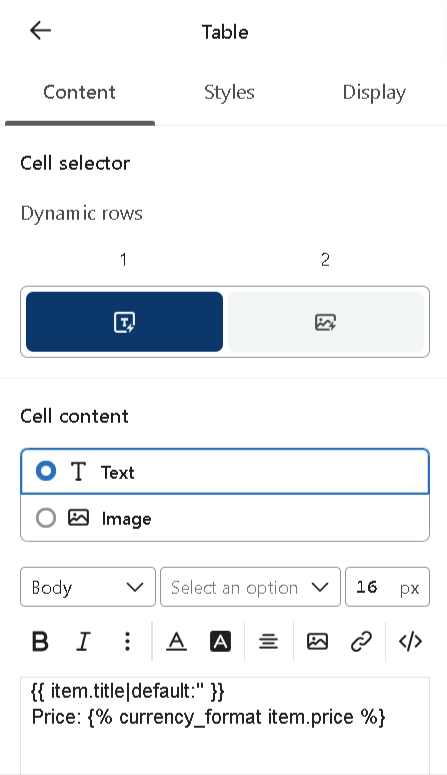
In the table below, we’ll explore the template tags you can use and how each piece of product information is referenced.
| Template Tag | Name | Description |
| {{event.currentWishlist.productId|default:” }} | Product Id | Inserts the product’s unique ID |
| {{event.currentWishlist.variantId|default:” }} | Variant Id | Displays the variant ID, which could be used for a product’s size or colour variation. |
| {{event.currentWishlist.productOption|default:” }} | Product Option | Variants are the specific, purchasable combinations of options, such as a shoe in a specific size and color. |
| {{event.currentWishlist.title|default:” }} | Title | Displays the product name |
| {{event.currentWishlist.storeName|default:” }} | Store Name | Displays the store’s name |
| {{event.currentWishlist.handle|default:” }} | Product Handle | Provides a dynamic link to the product page using the product handle |
| {{event.currentWishlist.price|default:” }} | Product Price | Provide a Sale price |
| {{event.currentWishlist.comparePrice|default:” }} | Product Compare Price | Shopify’s Compare-at price displays a crossed-out original price next to the discounted price to show customers their savings. |
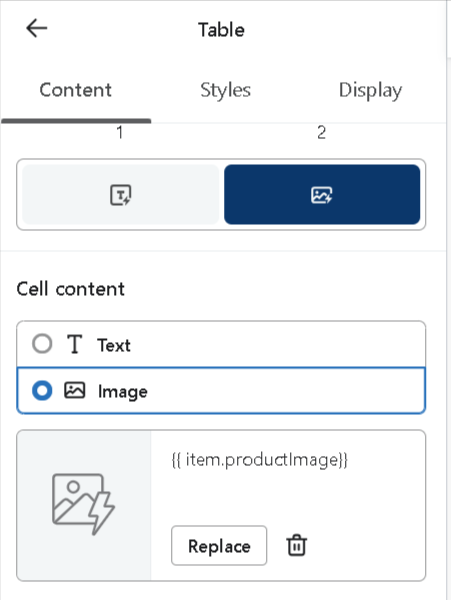
| {{event.currentWishlist.productImage|default:” }} | Product Image | Displays the product image dynamically by referencing the image URL associated with the product handle. |
| {{ event.allWishlist | default:” }} | Displays the entire wishlist with all items dynamically |
Video Tutorial for Setup: #
Add a dynamic table to your flow email: Learn from here #
- Edit the template
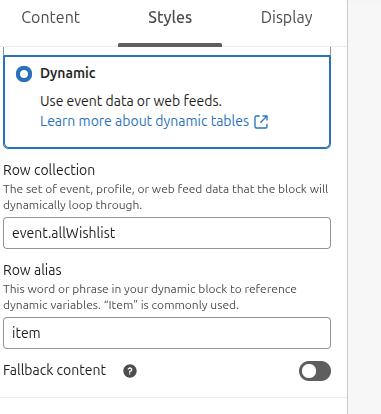
- Drag a table block into your email.
- Click Styles > Dynamic to convert the table into a dynamic block. You’ll see 2 fields appear: Row Collection and Row alias.
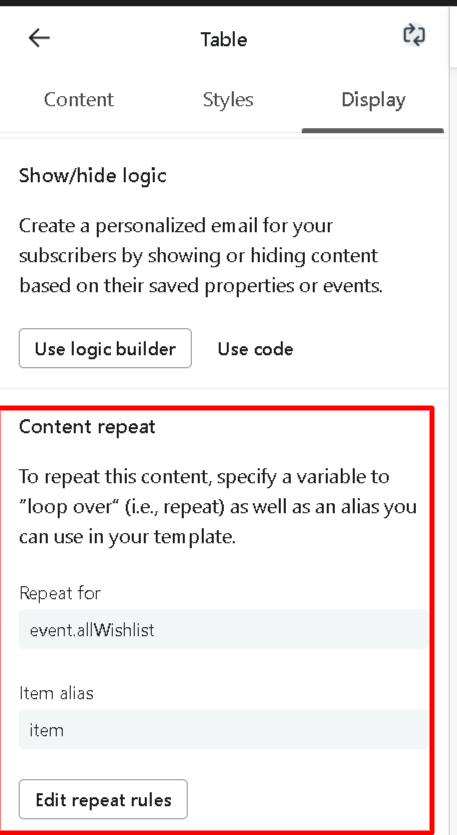
- Enter the event as shown in the screenshot below
- Click back to the Content tab to adjust your column types.
To repeat this content (optional) #
Key Considerations: #
Dynamic Personalisation: Dynamic tags such as these allow you to personalize your communications and make every email or SMS more relevant to the individual recipient. This leads to better customer experience and greater engagement.
Default Value: The |default:” filter protects against potential failures if a value is missing or unavailable by returning an empty string. This can be very helpful if some product attributes might not always be available.
Conclusion #
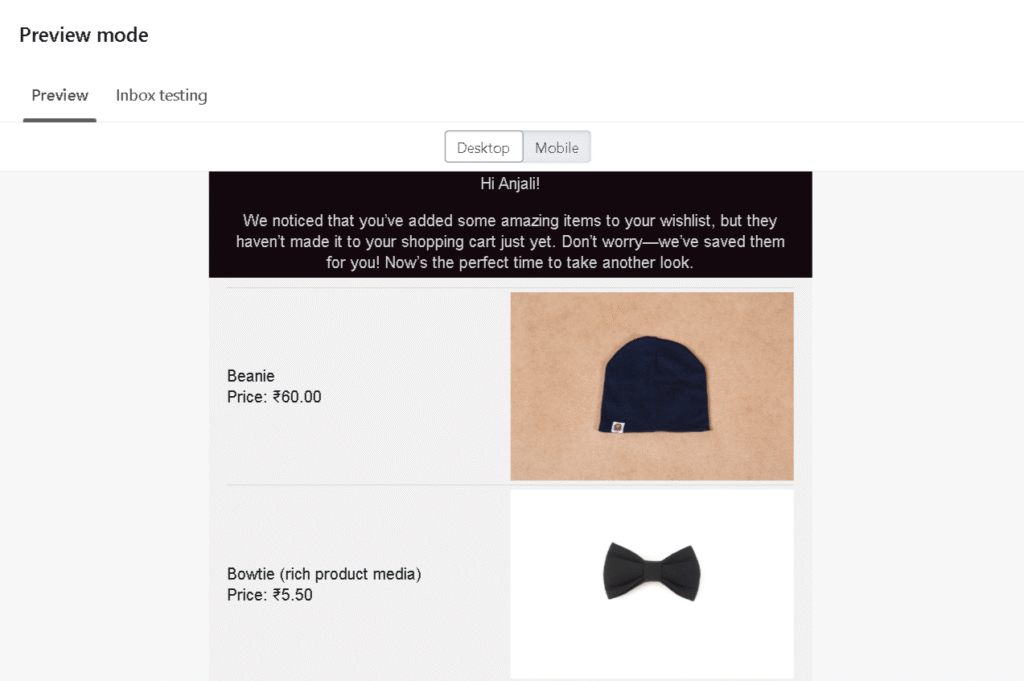
The integration of Klaviyo with the Wishlist Guru app exposes eCommerce store owners to new ways of interacting with customers in a timelier, more relevant, and more personal manner. By monitoring when customers add items to their wishlists, you can develop more efficient marketing campaigns that convert interest into sales. By triggering personalized emails, boosting conversions, and re-engaging customers, this integration is essential for stores that are looking to maximize their marketing campaigns and increase their revenue.
Ready to get started? Install Wishlist Guru and integrate with Klaviyo today and unlock the power of your customer data!


