
We already have header icon placement by default in the app, but if some of the users want to place the header icon matching their theme aesthetics, they can do so by simply going through this documentation .
Steps to configure wishlist header icon: #
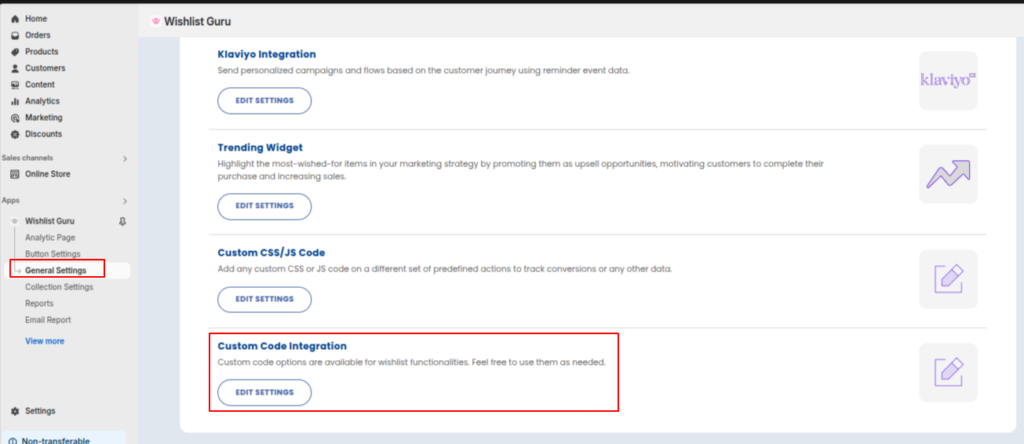
1. Go to the general settings
2. Scroll to the Custom code integration at the bottom of the page
3. Then navigate to the Wishlist icon or text with custom code section, where you can see the Custom short code.
Please turn on the toggle on the right side; this will allow the custom code to function properly.
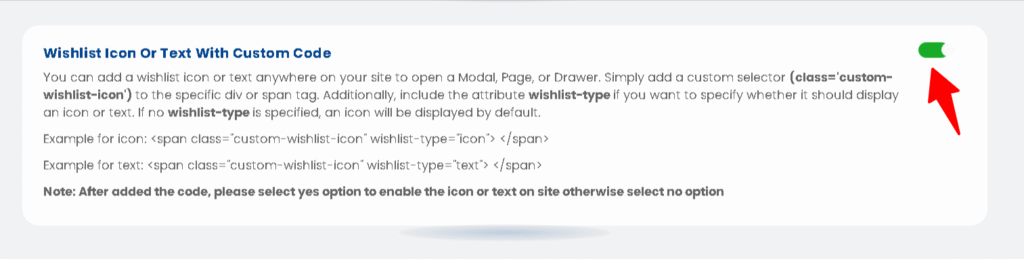
Here is the custom code that you can easily copy and paste into the file: #
For icon : <span class=”custom-wishlist-icon” wishlist-type=”icon”> </span>
For text : <span class=”custom-wishlist-icon” wishlist-type=”text”> </span>
Now, where to add this? #
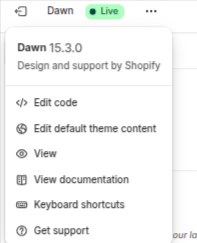
As an example, we have chosen “Dawn Theme” You can place the code according to your theme in the respective live theme that you select.
Steps for how to add custom code in the theme file: #
1. Go to the Online store, then click Themes Customise
2. Click on edit code as shown in the screenshot below, and search for the header file and paste the code where you want to show the icon or text.
3. You can add the code before or after the add to cart in the same ways as mentioned in this document.
Note: You can add a wishlist icon or text anywhere on your site to open a modal, page, or drawer. To do this, simply add a custom selector (class=’custom-wishlist-icon’) to the specific `<div>` or `<span>` tag.
Additionally, if you want to specify whether to display an icon or text, include the `wishlist-type` attribute. If the `wishlist-type` is not specified, an icon will be shown by default.

Add wishlist header icon using Static HTML (SUPER FAST Loading speed) : #
We provide a static HTML code for the wishlist icon. When you add this snippet to your store’s header file, the heart icon blends seamlessly with your theme design and renders instantly for faster performance.
<a class="header__icon header__icon--cart link focus-inset">
  <div tabindex="0" role="button" aria-haspopup="dialog" aria-controls="wishlist-dialog" aria-expanded="false" class="header-heart-position" onclick="heartButtonHandle()">
    <div class="red-heart heartICON" style="filter: brightness(0) saturate(100%) invert(0%) sepia(36%) saturate(6%) hue-rotate(319deg) brightness(98%) contrast(101%); height: 25px; width: 25px;">
      <span></span>
    </div>
    <span class="count-span"><span class="show-count"><b>0</b></span></span>
  </div>
</a>
This is for static header icon CSS for wishlist guru
.header-heart-position{
  position: relative;
  display: flex;
  align-items: center;
}

.header-heart-position .count-span {
    position: absolute;
    bottom: -5px;
    right: -5px;
}

.red-heart {
    background-size: cover;
    background-color: transparent;
    border: none;
    cursor: pointer;
    transition: transform 0.2s;
    background-repeat: no-repeat;
    background-position: center;
    margin-top: 0;
}

.show-count {
    display: flex;
    justify-content: center;
    background-color: #000;
    color: #fff;
    height: 15px !important;
    width: 15px !important;
    border-radius: 100%;
    align-items: center;
    font-size: 9px;
    line-height: calc(1 + 0.1 / var(--font-body-scale));
    cursor: pointer;
}

  .header-heart-position .heartICON{
      background-size: 25px;
  }

.header-heart-position {
    margin: 0 10px;
}

.heartICON {
  background-image: url("https://cdn.shopify.com/s/files/1/0643/8374/6245/files/heart_empty.svg?v=1757915706");
}
We can also do this customization for you on our end if you do not have any coding background just reach us out at support@webframez.com


